Ensuring your information is adequately backed up
Whether you just bought your iPhone or Mac, or if you have been a long time user, it is never too early or too late to get yourself prepared for a possible lost or stolen device. The main aspects of preparation includes ensuring that you have adequate tracking, and that your information is adequately backed up. We will cover how to do both in the steps below:
- You just bought your Mac or iOS device—congratulations! Now it’s time to protect it with AppleCare. Despite not protecting against theft or loss, it can work in your favor in the event that your recovered device turns out to be damaged. For iOS devices, AppleCare+ protects against two damage incidents with a fee. Below is info on how to purchase it.
For iPhone Users: Click Here – For iPad Users: Click Here. When purchasing AppleCare+, you are required to have a device checkup to ensure you are not purchasing AppleCare+ for a device that’s already broken. Keep all information handy and in a safe place (i.e. receipts of the device and AppleCare+ purchase). Found your lost iOS device or stolen device and it’s broken? Go to your local Apple Store and pay $49 for a repair.
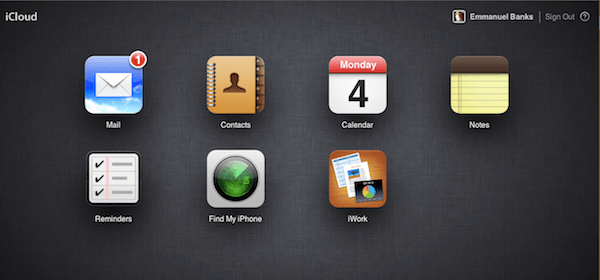
- Next step, ensure that you are fully signed up for iCloud. The cloud service allows you to have your contacts, calendar events, recent photos, music, apps, and more backed up. Targeted for increased productivity and easier device upgrading, iCloud is very useful for lost or stolen devices. You still have needed information readily available, and as we will show in the next step, it can even help you find your device. Here’s how to sign up for iCloud:
Backing Up Your Data On Mac
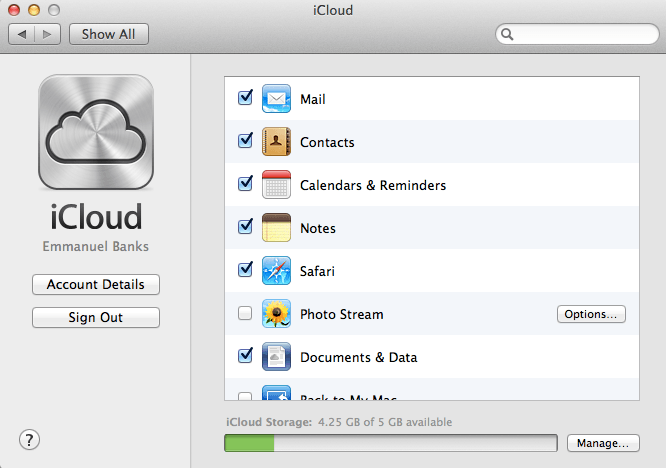
Ensure that your Mac has the latest update by first clicking the Apple symbol at the top, and then “Software Update”. Click “System Preferences”, then “iCloud”. When asked, enter your Apple credentials. If you’re not asked, you’re done! Check the boxes for the services you want to have iCloud backup. Whenever you sign in to iCloud on any iOS or Mac device, your information is applied if you choose it to be.
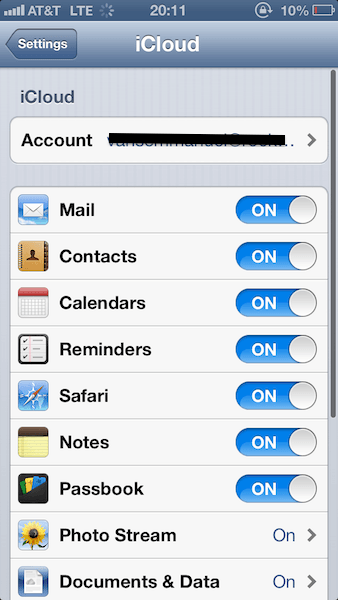
On iOS Devices
Go to “Settings” Click on “iCloud” Sign into your Apple ID. Once signed in, select which services you’d like to back up. “Storage and Backup” allows you to view your storage totals.
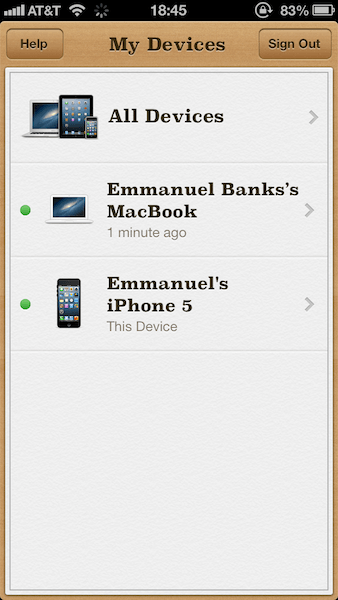
- Now that iCloud is activated, it’s time to activate Find My Apple Device. No, it’s not exactly called that—for iOS users it is known as “Find My iPhone“, and for Mac users it’s “Find My Mac”. To activate Find My iPhone on your iOS device, simply download the app from the App Store, and login. Using the Find My iPhone for iOS app is simple. The first page you are presented with is “My Devices”. Here, you are able to view the current status of all the devices connected to your iCloud account. When the device is on, you will notice a green light activated.
When you visit the app, you’ll be able to see the devices under “My Devices”. “All Devices” loads a map showing the relative location of your devices with Find My iPhone active.
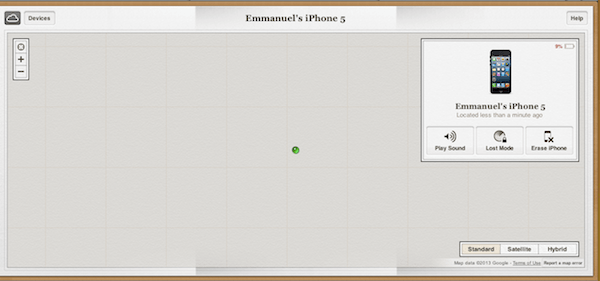
When clicking a specific device, you are able to click the green car to have driving directions to your lost or stolen device. For Mac users, it’s a bit of a different story; Find My Mac is technically already “downloaded” on all Macs with iCloud, so simply ensure that the box is checked in the iCloud settings in System Preferences. But what happens when you don’t have either device near you to monitor their current location? No problem—simply go to iCloud.com, sign in, and go to Find My iPhone. You can activate an alarm, lock, or activate a remote wipe of your Mac or iOS device.
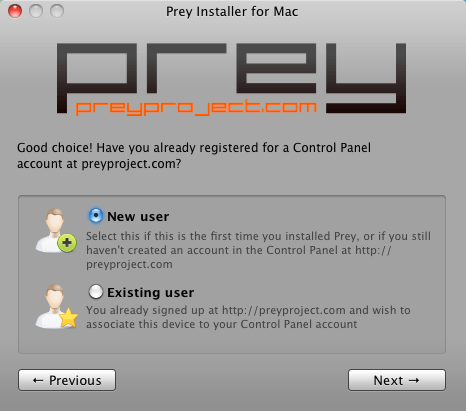
Bonus Tip: If you’re looking for more features in recovery of your Mac, or even your Android device, Prey is a great free service that lets you cover up to three devices.
Your Data: At Risk
The options above aren’t necessarily surefire ways to allow you to become reunited with your iPhone. For example, iCloud features including Find My iPhone are only helpful if your device is on and connected to a cellular/Internet connection. Also, if you don’t have a device discovery service active, it’s nearly impossible to recover your iPhone. The only option in these situations is to cut off cellular service on the device in question and to purchase a new one. This doesn’t mean that your data isn’t at risk until then: for many users, their iPhone is their life. This means that services like Facebook and emails are connected to the device and easily accessible. Here are a couple of tips on what to do next:
Change Your Passwords Immediately
One of the best precautions you can make is to change the passwords of the services connected to your iPhone. This includes email addresses, social media accounts, and in some cases your Apple ID. This can prevent the possibility of compromising information to be posted on your accounts, and even more importantly, to prevent personal information from being stolen.
Monitor Account Activity
In the days after your iPhone is officially deemed lost, you should still monitor your accounts for any suspicious activity. Financial accounts are top priority if you made use of apps like Mint or your personal bank’s app. This will allow you to catch unwanted access, allowing you to contact your bank and bring the attention to them.
Prepare for the Future
This is also a great opportunity for you to safeguard your accounts from future attacks. If you are a Google user, for example, you may want to look into two-factor login: this works by requiring the individual to bypass two steps of information before gaining access. In return, this tricks systematic hacks and deters individual hackers.
Current Find My iPhone Users
If you are lucky enough to be a Find My iPhone user, the stressful situation of a lost or stolen iPhone is alleviated just a bit. At least while it is connected to an Internet connection, you are able to see the current status of your device. If you are near a computer, follow the following steps below to protect your information:
Play a Sound: Perfect for a simple misplacement around you. Lock: A simple misplacement when you see that your iPhone isn’t in your immediate vicinity. Remote Wipe: A prolonged misplacement, a verified theft, or a misplacement in a compromising location (theme park, concert, etc).
Activating remote wipe when you just lost your iPhone or Mac under your bed can result in a huge headache, so be careful with that one.
Other Tips
For individuals who didn’t activate Find My iPhone, you still have options. First, call your service provider and inform them of your misplaced or stolen iPhone, which will allow your service provider to be informed in the event of high charges. They can also deactivate your iPhone. Informing the authorities can also be helpful in the event of a theft of any device. Life After the Theft Chances are, if you had your iPhone stolen, you will be even more determined to purchase a second iPhone this time around. You shouldn’t allow a theft to prevent you from being an iPhone user, and when you get a new iPhone, Apple makes it seamless to apply your old information onto your new device. During the setup of your new iPhone, you are then asked if you’d like to Restore from iCloud Backup or Restore from iTunes Backup. When going with the iTunes route, all you have to do is simply connect your iPhone to the Mac that backed up your last iPhone. You can then click the iTunes backup under the options in “Restore from the Backup of: …” From there, click “continue”. When going down the iCloud route, you can select the latest backup on the “Choose Backup” page. From there, click “Restore” and allow your iPhone to restart on its own.